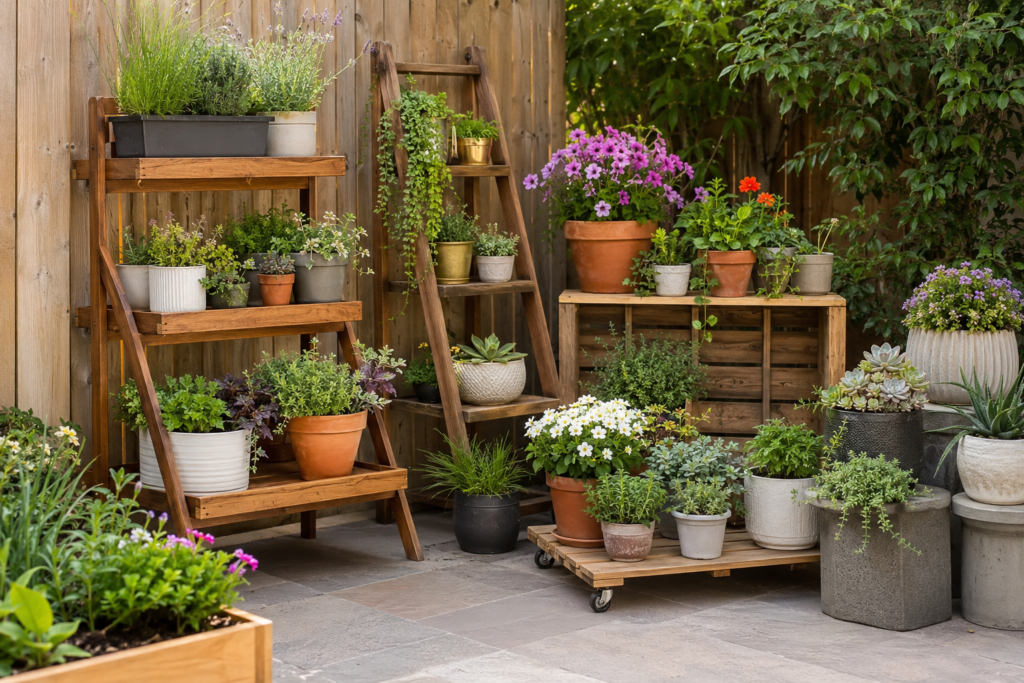
Backyard DIY outdoor plant stand ideas can turn scattered pots into an organized display, create vertical growing space, and make watering and plant care easier. From tiered wooden shelves and ladder stands to crate towers, rolling platforms, and masonry displays, these projects help you use patios, fences, corners, and garden walls more effectively.
Choose a stand according to available space, fully watered pot weight, sunlight, drainage, wind exposure, mobility, and your DIY skills. Outdoor stands must support every pot base, resist sideways movement, drain freely, and tolerate repeated weather exposure.
Safety note: Homemade stands do not have a certified load rating unless the exact design has been professionally tested. Keep heavy pots low, inspect joints regularly, and avoid tall stands where falling containers could cause injury.
Which DIY Plant Stand Should You Choose?
A three-tier wooden stand is the best all-purpose option because it offers good capacity, clear plant visibility, and manageable construction. Choose a ladder stand for a narrow patio, a low A-frame for a windy area, a masonry shelf for heavy pots, or a rolling platform for one large planter.
The best plant stand should solve the main limitation of your backyard. A compact yard may need vertical capacity, while an open lawn may need a broad base and stable footing. A renter may prioritize folding or modular construction, while a gardener with large ceramic pots should focus on low shelves and short unsupported spans.
Also consider how often you water, whether the stand will remain outside year-round, and whether one person must be able to move it. These practical details often matter more than decorative style.
| Main need | Best stand |
|---|---|
| Best overall | Three-tier wooden stand |
| Small patio | Ladder stand |
| Heavy pots | Cinder-block shelf |
| One large planter | Rolling platform |
| Windy yard | Low A-frame |
| Rental property | Folding or modular stand |
| Empty corner | Triangular corner stand |
| Herbs | Waist-height herb shelf |
| Privacy | Trellis or screen stand |
| Low maintenance | Masonry-supported shelf |
Before choosing, measure the location and pots, confirm the surface is level, check sunlight, and leave room for watering and walking. The simplest stand that safely meets these needs is usually the best choice.
How We Evaluated These Ideas
Each idea was evaluated by footprint, construction difficulty, pot suitability, drainage, stability, mobility, maintenance, accessibility, and backyard location. Decorative appeal mattered, but function came first.
No universal capacity is assigned because performance changes with material quality, shelf span, fasteners, bracing, workmanship, and load placement. Readers should verify their own build through gradual loading and regular inspection.
Which Plant Stand Is Best?
For mixed collections, choose a three-tier stand. For heavy ceramic pots, use a low reinforced shelf or masonry base. Renters benefit from folding, modular, or rolling stands that require no permanent attachment.
Measure the pot base, rim, height, saucer, mature plant spread, and watered weight. Also leave clearance for gates, chairs, hoses, and pathways. A stand that fits the space but blocks movement will not remain practical.
What Are the Best DIY Plant Stand Ideas?
Easy and Low-Tool Ideas
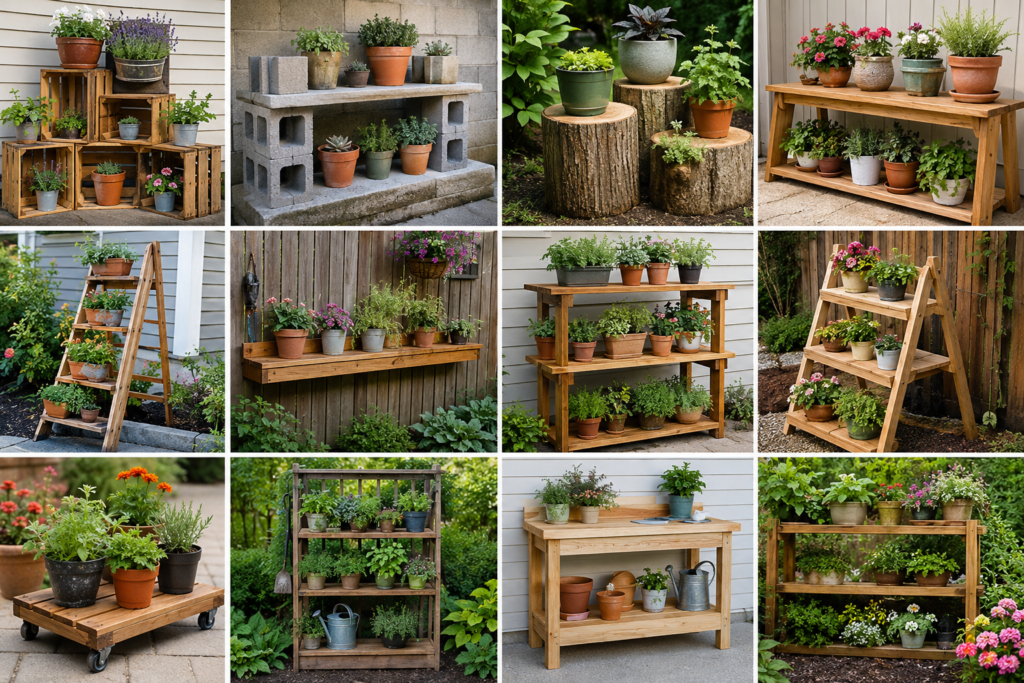
1. Wooden Crate Stand
Arrange strong crates horizontally and vertically to create staggered shelves. Fasten them together and seal all surfaces. Use decorative crates only for lightweight pots or reinforce them with a stronger frame.
2. Cinder-Block and Board Shelf
Rest weather-resistant boards across pairs of concrete blocks. Add a center support beneath long spans and place the blocks on firm paving or compacted gravel. This is one of the easiest options for heavy pots.
3. Tree-Stump Pedestal
Level both ends of a solid stump and check for decay or insects. Keep it low and wider than the pot base. Several short stumps create a safer display than one tall pedestal.
4. Outdoor Bench Display
Use an old garden bench as a long plant shelf. Inspect legs, slats, and joints before loading it. Leave some open seat space for cleaning and visual balance.
5. Low Concrete Pedestals
Use concrete blocks, pavers, or short cast platforms for heavy containers. Keep each pedestal broad and low. Protective pads can prevent scratches on finished paving.
6. Low Succulent Table
A broad slatted table suits succulents, cacti, and small pots. Drainage gaps prevent standing water, while the low center of gravity improves stability. Small pots may need more frequent watering.
7. Mixed-Height Pedestals
Build several separate platforms instead of one large stand. Place heavy pots on the lowest units and lightweight pots higher. Repeat the same finish to unify the display.
Space-Saving Ideas
8. Leaning Ladder Stand
Use wider shelves at the bottom and narrow shelves above. Add anti-tip restraints and leave an air gap behind the stand. Upper shelves should hold only lightweight pots.
9. Narrow Fence-Side Shelf
A shallow shelf, usually 8–12 inches deep, works well for herbs and compact flowers. Add intermediate supports and leave enough room behind it for airflow and fence maintenance.
10. Triangular Corner Stand
A triangular stand uses an otherwise empty patio corner. Measure both walls because corners are not always square. Adjustable feet help on sloping paving.
11. Window-Height Flower Shelf
Raise flowering pots to a level visible from indoors. Keep the stand clear of window openings, ventilation, and emergency access, and prevent wet foliage from pressing against siding.
12. Fence-Mounted Pot Rail
Mount secure pot holders on a strong fence or rail. Confirm the fence can support several watered pots and that attachment is permitted. Avoid weak decorative panels.
13. Reclaimed Pallet Rack
Use a clean, sound pallet as a vertical backing for small holders or shelves. Reject pallets with rot, chemical staining, deep cracks, or unknown contamination, and anchor the rack securely.
Tiered and Heavy-Pot Ideas
14. Three-Tier Wooden Stand
This is the best overall design for mixed collections. Use the deepest shelf at the bottom, narrower shelves above, drainage gaps, and rear bracing. Keep the largest pots on the lowest level.
15. A-Frame Plant Ladder
An A-frame provides a broad triangular base and can display pots on both sides. Install a chain, strap, or rigid spreader, and balance the weight between both sides.
16. Rolling Planter Platform
Build a low platform slightly larger than the planter base. Use locking outdoor casters rated for the combined weight of the platform, pot, soil, plant, and water.
17. Modular Stackable Shelves
Separate boxes or shelves can be rearranged as the collection changes. Use pins, blocks, or fasteners between stacked units instead of relying on friction.
18. Sloped-Yard Platforms
Create several individually leveled platforms rather than one large stand across uneven ground. Prepare compacted bases and inspect them after heavy rain or soil movement.
Multifunctional Ideas
19. Herb Stand With Storage
Raise herbs to a comfortable harvesting height and use a lower shelf for tools. Store supplies in a waterproof box because drainage may reach the storage area.
20. Trellis Plant Stand
Combine a low shelf with a vertical trellis for climbing plants. Secure it carefully because mature foliage increases wind load, and leave access for tying stems.
21. Potting-Bench Display
A potting bench provides a worktop, upper shelf, and lower storage. Keep the work surface clear, avoid edges that trap water, and store growing media in sealed containers.
22. Privacy-Screen Stand
Combine a broad lower shelf with lattice or vertical slats. Use a wide base and suitable anchoring because the upper section catches wind. Keep heavy pots at ground level.
Decorative and Advanced Ideas
23. Hanging Basket Frame
Use upright posts and an overhead beam for trailing baskets. Watered baskets are heavy and move in wind, so use closed hooks and keep the frame away from paths and seating.
24. Metal Pipe Stand
Metal pipe creates a narrow modern frame. Use suitable fittings, broad feet, and corrosion protection. Inspect cut ends, scratches, and joints regularly.
25. Folding Outdoor Shelf
A folding stand suits rentals and seasonal displays. It must lock securely when open. Use light or medium pots and inspect hinges and moving parts often.
How Much Does a DIY Plant Stand Cost?
Cost depends on material, size, fasteners, finish, casters, delivery, and whether tools are already available.
| Stand type | Relative cost | Hidden expense |
|---|---|---|
| Cinder-block shelf | Low | Transport |
| Reused bench | Low | Repairs and coating |
| Crate tower | Low to medium | Reinforcement |
| Three-tier stand | Medium | Fasteners and finish |
| Rolling platform | Medium | Quality casters |
| Metal pipe stand | Medium to high | Fittings and tools |
| Privacy stand | High | Framing and anchoring |
Reclaimed material is not always free after sanding, reinforcement, and finishing. Building usually saves money when tools are already owned and custom dimensions are needed. Buying may be better for folding, engineered, metal, or manufacturer-rated designs.
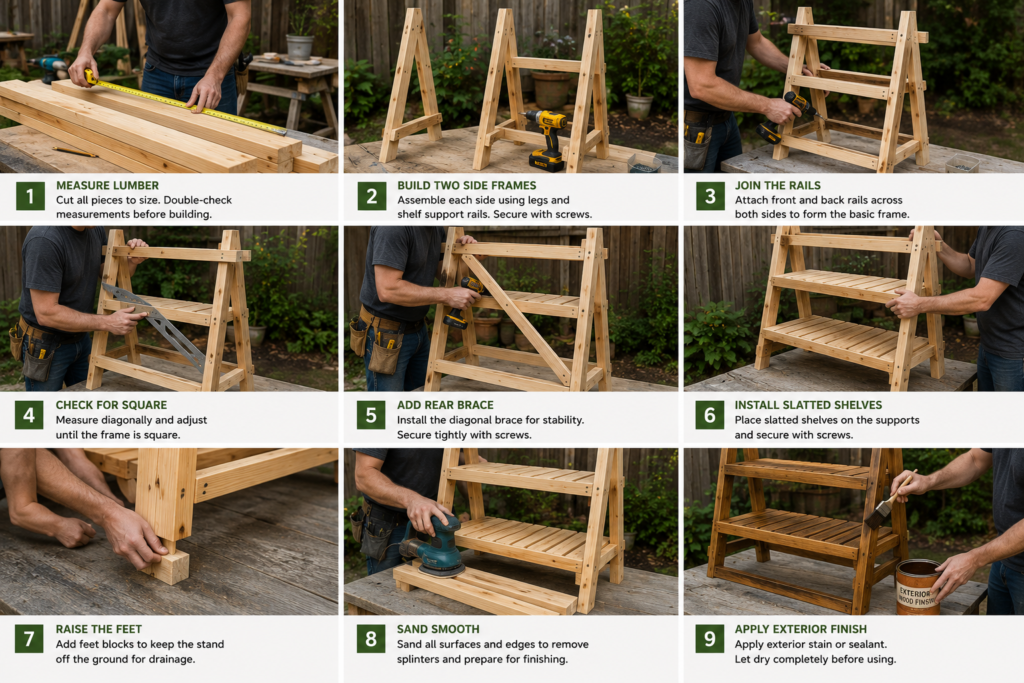
How Do You Build a Three-Tier Stand?
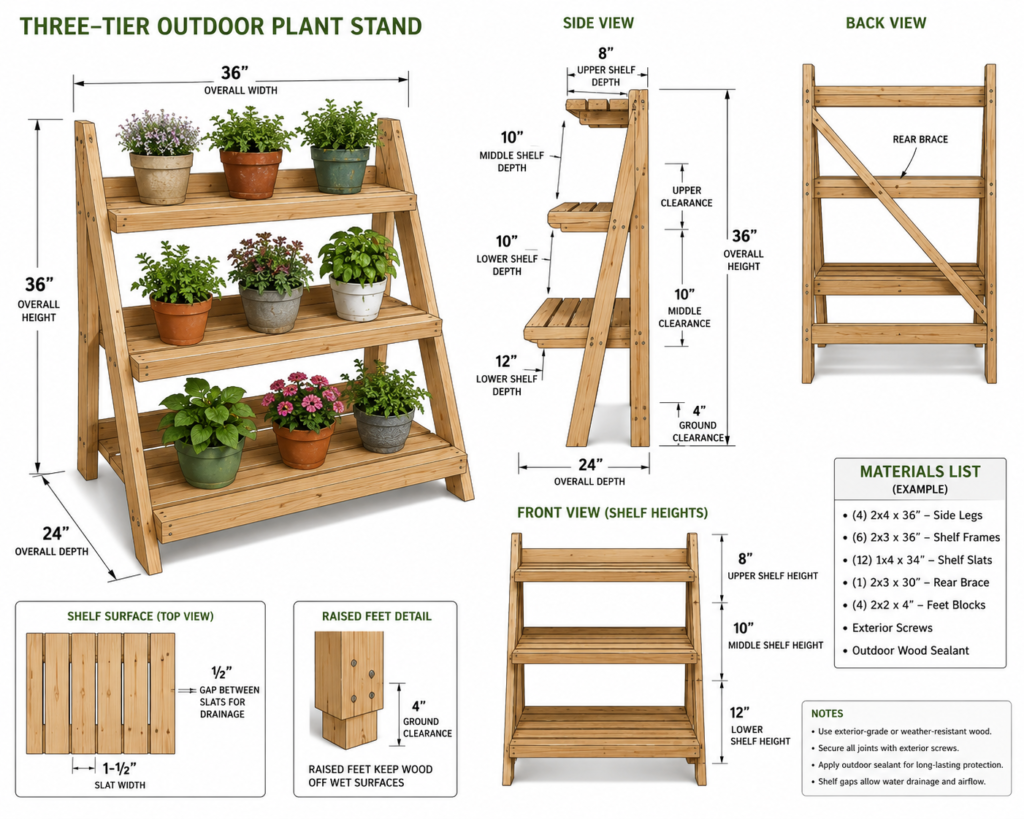
A practical starting size is 36 inches wide, 24 inches deep, and 36 inches high, with 12-, 10-, and 8-inch-deep shelves. Leave about 10–12 inches between levels.
Use exterior-suitable lumber, compatible screws, a rear brace, raised feet, and an outdoor finish. Basic tools include a saw, drill, square, clamps, sander, tape measure, and level.
- Measure the site and pots.
- Build two matching side frames.
- Join them with front and rear rails.
- Square the frame by comparing diagonal measurements.
- Add a rear brace.
- Install shelf slats with 1/4–1/2-inch gaps.
- Raise the feet above persistent moisture.
- Sand and finish every face.
- Level the empty stand and load it gradually.
How Do You Test a Plant Stand?
Test the stand in its final location. First check level, press gently on each corner, confirm all feet touch the surface, and tighten connections.
Add the heaviest pot to the lowest shelf, then load the remaining shelves gradually. Stop if a shelf bends, a joint opens, a screw pulls out, a foot lifts, or the frame moves sideways.
Water the pots and inspect again for extra deflection, trapped water, overflowing saucers, or new rocking. Repeat the check after several days and after severe weather. Record any movement or maintenance so you can compare the stand’s condition over time.
How Did Our Plant Stand Perform?
Only publish this section after completing a real build. Record the finished dimensions, material, fasteners, total cost, build time, number of pots, heaviest watered-pot weight, modifications, and condition after 30–90 days.
A genuine case study should explain what worked, what changed, and what would be improved. If no physical test exists, omit this section rather than inventing experience.
Which Recycled Materials Can You Use?
Strong crates, clean pallets, old ladders, benches, metal carts, blocks, stumps, and leftover exterior lumber can become useful stands. Inspect them for decay, splits, insects, chemicals, rust, loose nails, weak joints, and warping.
Avoid particleboard, moisture-damaged furniture, cracked plastic, rotten pallets, severely rusted metal, and materials with unknown chemical exposure. Reuse material only when you understand its history and can reinforce it safely.
What Is the Best Plant Stand Material?
| Material | Main advantage | Main limitation |
|---|---|---|
| Cedar or redwood | Attractive and workable | Higher cost |
| Treated lumber | Practical outdoors | Needs compatible hardware |
| Coated metal | Slim and strong | Coating damage can rust |
| Masonry | Stable and durable | Heavy |
| Untreated softwood | Affordable | More maintenance |
| Composite boards | Low maintenance | May need closer supports |
Exterior wood balances appearance and workability. Masonry suits heavy pots, while coated metal works well in narrow modern spaces. Whatever the material, protect feet, joints, cut ends, and horizontal surfaces.
Local availability should influence the final choice. A durable regional wood with suitable hardware may be more practical than an imported species that is expensive to replace. Match material weight to mobility; a stand stored seasonally should remain manageable when empty.
Which Materials Suit Your Climate?
In rainy or humid climates, prioritize drainage gaps, raised feet, airflow, and corrosion-resistant hardware. In hot climates, lighter finishes and wider pot spacing can reduce heat buildup.
Windy or coastal areas need low, broad stands, strong bracing, and corrosion-resistant connectors. Freezing climates require clear drainage and protection from trapped water. Dry climates still need UV-resistant finishes and checks for wood splitting.
What Size Should a Plant Stand Be?
Low pedestals may be 8–18 inches high, while herb stands often measure 30–40 inches. A width of 30–42 inches suits many patios, but wider shelves may need center supports.
Small pots often need shelves 8–10 inches deep; medium pots may need 12–16 inches. Allow about 10–14 inches between levels for compact plants and more for tall foliage.
Keep heavy pots below knee height, frequently used herbs near waist height, and all pots within comfortable watering reach. The best size is the smallest one that safely supports the intended collection.
How Much Weight Can It Hold?
There is no universal capacity for a homemade stand. Total load includes the pot, growing mix, plant, retained water, stones, stakes, saucers, and reservoirs.
Weigh large pots after watering. Place the heaviest ones on the lowest shelf near the legs or supports. Stop using the stand if shelves bend, joints open, connectors rust, feet rock, or casters loosen.
How Do You Keep It Stable?
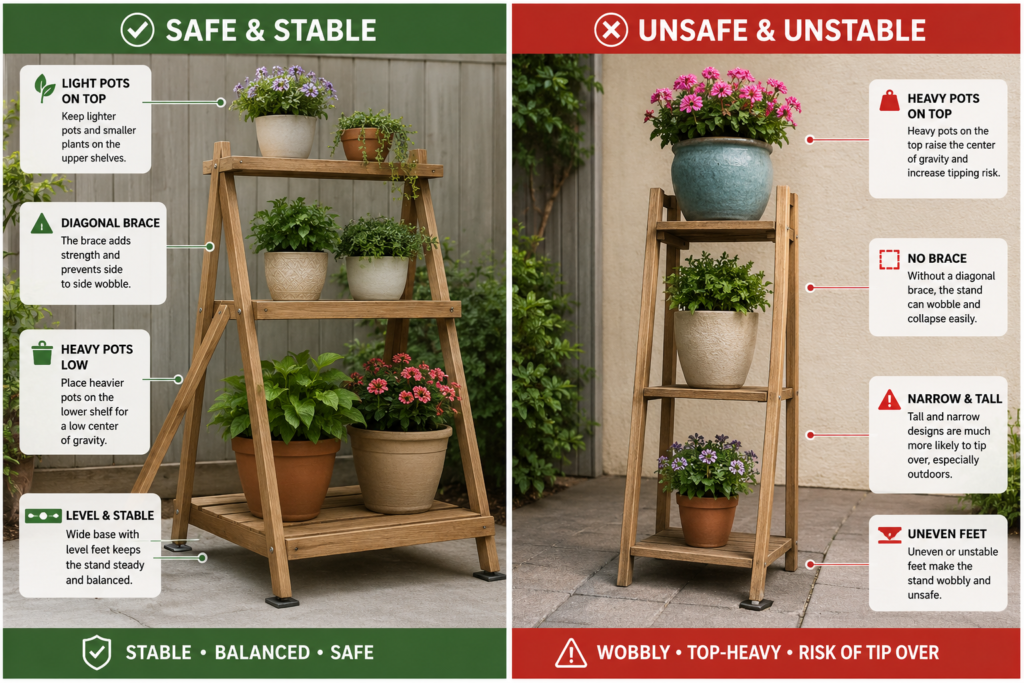
Use a broad base, firm level surface, strong joints, diagonal bracing, and low placement of heavy pots. Soft soil and loose gravel may require pavers or broad pads.
Tall stands may need anti-tip restraints. Lock casters, keep upper shelves lightly loaded, remove hanging baskets before storms, and reassess stability as plants grow.
How Do You Weatherproof a Plant Stand?
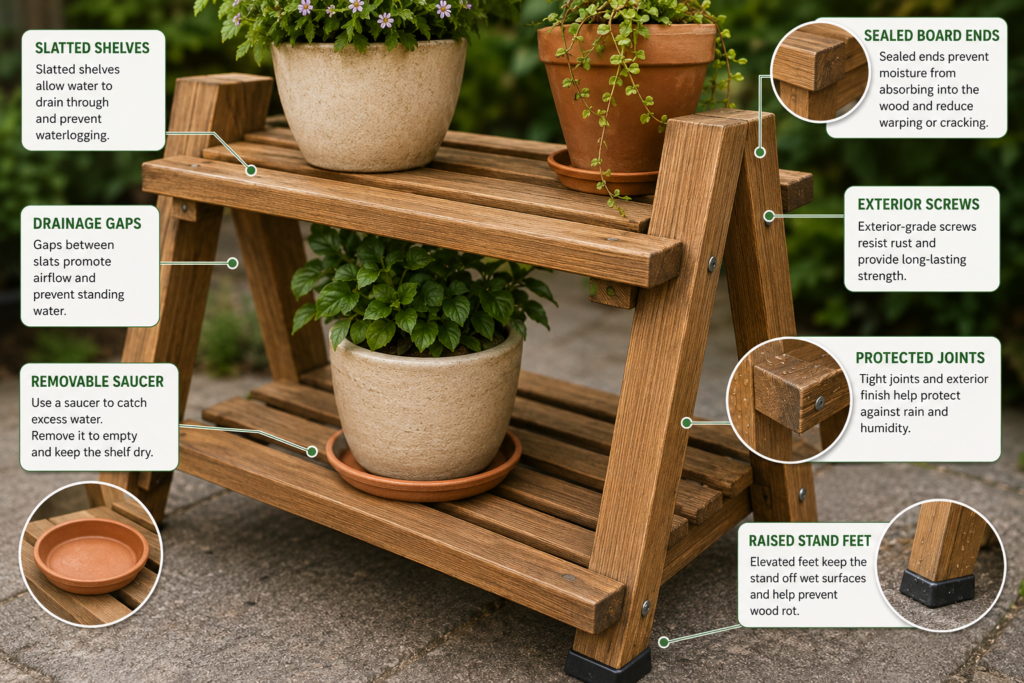
For wood, coat all faces, including end grain, feet, shelf undersides, screw holes, and cut ends. Use slatted shelves, pot feet, and raised legs to encourage drying.
For metal, repair scratches and rust, and inspect welds, bolts, hollow tube ends, feet, and casters. Weatherproofing is an ongoing combination of drainage, coating maintenance, cleaning, and repair.
How Should You Arrange the Pots?
Place heavy and tall pots on the lowest shelf, medium plants in the middle, and lightweight or trailing plants on top. Position sun-loving plants where upper shelves will not shade them.
Leave gaps for airflow and watering. Use drainage holes and empty saucers. Group plants with similar moisture needs to make care easier, and repeat pot colors or plant shapes for visual balance.
Which Stand Suits Each Backyard Area?
Use a ladder or corner stand on a small patio, an A-frame or masonry shelf on an open lawn, and a shallow shelf along a fence. A triangular stand suits a shaded corner, while broad feet and drainage protection are important on decks.
Choose modular or folding stands for rentals, low broad stands for windy areas, and separate leveled platforms for slopes. Near the house, leave room for airflow, drainage, and wall maintenance.
How Long Does a Plant Stand Last?
Lifespan depends on material, climate, drainage, ground contact, loading, finish maintenance, and movement. Wet feet, trapped water, corroding fasteners, unsupported shelves, and repeated movement while loaded shorten service life.
Untreated softwood usually needs more maintenance. Exterior wood performs better when raised and refinished. Coated metal lasts longer when scratches are repaired, while masonry requires little coating but may settle or crack. Judge the stand by condition, not age.
What Makes DIY Plant Stands Fail?
Common causes include indoor materials, excessive shelf spans, missing bracing, trapped water, unsuitable fasteners, uneven bases, and heavy pots placed high.
Failure is more likely when stands are overcrowded, moved while loaded, or built too tall and narrow. Use exterior materials, shorten spans, add supports, keep heavy pots low, and inspect the frame regularly.
Should You Build or Buy One?
Build when you need custom dimensions, already own tools, and want a simple low structure. Buy when you need a stated capacity, warranty, engineered folding system, or specialized metal design.
Useful purchases include exterior screws, locking casters, adjustable feet, anti-tip restraints, pot feet, finishes, ready-made stands, and woodworking plans.
How Do You Maintain a Plant Stand?
Monthly, remove debris, tighten screws, empty standing water, check caster locks, and confirm the stand remains level.
Seasonally, unload and clean the structure. Inspect wood for softness, splits, and peeling finish, and metal for rust, loose bolts, and cracked welds. Before storms, remove upper pots and hanging baskets. Replace the stand when legs, shelves, fasteners, or welds can no longer be repaired safely.
DIY Outdoor Plant Stand FAQs
What Is the Easiest Stand to Build?
A cinder-block and board shelf requires few tools and no complex joints. A low bench or reinforced crate display is also beginner-friendly.
What Wood Works Best?
Cedar, redwood, and treated lumber are common outdoor choices. Select according to availability, climate, maintenance, and compatible fasteners.
Can Untreated Wood Be Used?
Yes, in sheltered locations with exterior finish and raised feet. It generally needs more frequent inspection and maintenance.
How Deep Should Shelves Be?
Allow 8–10 inches for small pots and 12–16 inches for medium pots. The full base must remain supported.
Can a Stand Sit on Grass?
Temporarily, yes. For long-term use, place it on level pavers, compacted gravel, or broad pads to prevent sinking.
Should Heavy Pots Go on Top?
No. Keep heavy pots on the lowest shelf near the main supports to reduce bending and tipping risk.
Can Pallet Wood Be Used?
Yes, when it is clean, sound, and free from rot or chemical contamination. Anchor vertical pallet racks securely.
Can the Stand Stay Outside in Winter?
Yes, when its material and finish suit the climate. Clear trapped water, remove fragile pots, and inspect after freezing weather.
Is Building Cheaper Than Buying?
Building may cost less when tools are already owned. Buying can be better for folding, metal, wheeled, or manufacturer-rated stands.
What Works Best in a Windy Yard?
Choose a low A-frame, broad tiered shelf, or masonry-supported stand. Avoid tall narrow racks and lightly anchored screens.
Final Plant Stand Checklist
Before building, measure the space and pots, check sunlight, estimate wet weight, and select suitable material. During construction, keep the frame square, add bracing, use outdoor fasteners, provide drainage gaps, and protect the feet.
Before loading, level the stand, test for rocking, add pots gradually, and water-test the structure. During use, keep drainage open, tighten connections, inspect after storms, maintain the finish, and replace weakened parts.
A well-planned backyard DIY outdoor plant stand should make plants easier to organize, water, inspect, and enjoy. The best design is not the largest or tallest, but the one that remains stable, accessible, weather-resistant, and easy to maintain.

Myra is the founder and lead writer of Backyard Planter Ideas, where she shares practical, well-researched guidance on planter design, plant selection, and outdoor styling. Her goal is to help homeowners create attractive, functional garden spaces with clear, reliable, and easy-to-apply advice.